Benefits of using Octopus Deploy Integration Tasks in vNext Builds

If you are like me and you use Octopus Deploy for deploying your projects; it can be a challenge to keep your OctoPack version updated. Restoring the OctoPack NuGet package each time you build with VSTS or TFS can be a challenge because if you perform a TFS XAML Build the build will fail because it cannot find the associated OctoPack targets and associated dlls. A workaround is to include the packages folder that contains the OctoPack targets file and associated dlls with your checked-in codebase, but that can be messy and lead to artifacts being left over in the case you wish to upgrade OctoPack to a newer version.

Another detractor to leveraging OctoPack in your solution sometime around version 3.4 a number of breaking change were introduced that caused nuget push issues. The teams that I work with on a daily basis are still on an older version of Octopus and when they installed the latest version of the Tentacle issues started to crop up along with failed builds and pushes to the internal NuGet repository.

So what are the benefits? According to the marketplace documentation, you can still use your OctoPack MSBuild arguments, but it doesn’t really apply to your older XAML builds.

Benefits of Octopus Deploy Integration

Some of the larger benefits when using the Octopus Deploy integration steps are:

  • You are always up-to-date
  • You have a clean project (no more packages to put with your codebase)
  • You have more Octopus Steps to play with (OctoPack can do them, but again it means more MSBuild parameters)
  • Troubleshooting is easier (Build shows all of the output in the console)

Benefits of vNext Builds with Octopus Deploy Integration

There are others who have blogged about the benefits of moving to the next version of Build. So I won’t go into the particulars. Suffice to say that replicating your XAML build in the new Build system is extremely beneficial and coupled with the Octopus Deploy Integration extension it can be even more powerful (https://octopus.com/vsts).

  • Control – You own it, you build it
  • TaskGroups (combined step tasks for Build templates)
  • Build Templates (cloneability, reusability)
  • Cleaner Visual Studio Solution
  • Centralized build/package/deploy processes
  • Decoupling of dependencies to installed packages

Even if you still want to use OctoPack, you can, you just have to take your old MSBuild arguments and paste them into the Visual Studio Build Step MSBuild Arguments parameter. Under the covers, it still does a lot of the same work, but the added benefit of with using the Octopus Deploy Package, Push steps allows for cleaner output logs during a build, package and push. One other benefit not mentioned previously is that with the new Build System you don’t have to check-in your packages folder that contains the OctoPack information (the NuGet Restore step takes care of that).

Gotchas

There probably some especially around references, but I can’t think of any that would hinder the overall usage.

Finally

The better approach of keeping a clean project/solution and letting TFS/VSTS do all of the work is just makes sense. Cluttering your project with excess complexity can make sustainable, reusable codebases hard to achieve. Coupled with that is the fact that over complicating your solution can also cause other developers within your team to have trouble trying to build the solution locally.

CI/CD with TFS/VSTS and Octopus Deploy

Building off my previous posts here and here about building multiple projects within a solution and troubleshooting packaging of your projects. We will now delve deeper into the Continuous Integration and Continuous Deployment pipeline that can ease the tensions of Deployment Aversion. Using two very powerful tools in your arsenal, you can streamline your deployment process and ensure that you are getting the biggest bang for your buck. Up until now we have identified our pipeline components and we have successfully, albeit manually, deployed our sample codebase to our destination servers. The question now is: can I streamline my pipeline using good ALM practices?

Assumptions

  1. You have your source code checked in
  2. Your build definition is in place
  3. You either have a partial Octopus Deploy project or similar

Setting up for success

Lets double check our Octopus Deploy Project. We will need to ensure that we have certain steps, configuration values, and settings.

Lets start out with cloning our already working deployment project.

image

Save our newly cloned project. We will get back this Octopus Project in a moment, but first we will need to do somethings with our TFS/VSTS build definition. In this example, we will expand upon our previous build definition and clone it. Why? Well first we know that it works and second it is easier to take away unneeded steps instead of trying to add and configure steps from memory. Cloning a Build Definition is very simple and straight forward. The below gif shows you how its done.
CloneBuildDefinition

Since our build definition is only queued manually we will need to go and make some changes to the Triggers for the build to allow it to perform the CI for the beginning of our CI/CD pipeline. We will edit our newly cloned build definition and choose the Triggers tab and then select.  For now we will just check the Continuous Integration and leave the defaults.

image

Now each time there is a change to the codebase and change is checked in, this build definition will start and finish with our packages being pushed to Octopus Deploy. One of the many benefits here with the use of Triggers is that you can have multiple build definitions that can focus on specific branches and with CI/CD working in your favor your can get your code to testers or others for faster consumption and approval.


CI/CD Option 1

You are probably asking yourself why there is an Option 1 and 2. Well the fact of the matter is that with Octopus Deploy Extension you basically  perform can perform all of the steps of packaging, creating a new release, and finally queuing up a deploy.  Essentially, TFS/VSTS is now a one stop shop for building and orchestrating  your build and deployment pipeline.

How to perform Option 1

Going back to our CI/CD build definition we need to add a couple of more steps. Click add build step and select and add Create Octopus Release and Deploy Octopus Release.

image

Now we see that for our entire build definition we can build, test, package, publish, create and finally deploy a release. If you noticed that there was Promote Octopus Release, that task can be used in other build/deployment scenarios. For now, though, we are just going to use the create and deploy release.

image

Editing our create Octopus release step, we see a lot of options that we will need to fill out. We fill out the Octopus Deploy Server connection endpoint, we select the project name. For now we are going to use the Octopus defined version number, but later we can change this to be what ever SemVer compatible version number we want to display. Finally in the Deployment section we select our initial environment we would like to deploy to. After that because I like verbose logging for troubleshooting, select the Show Deployment Progress. This will ensure that we have a complete set of logs for our End-to-End test.

image

One thing to note here is that you add a lot of data for your release notes. This great for troubleshooting or even attempting to rollback to an earlier series of changesets.

We are going to kick off a manual build/release creation first, but to make sure that we are putting everything in the correct order.

imageimageimage

and the end result without doing anything special with Octopus Deploy.
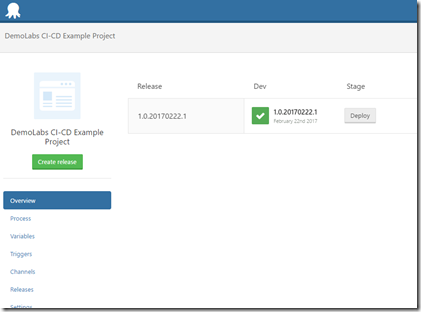
image

and now our Web application is still functioning.
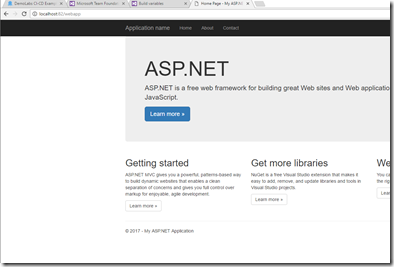
image

Let’s go and make a change now in our source code, check it in and then see what happens.

Made some changes to our index page.

image

checked it in

image 

Synced with the master (because this is a Git repo)
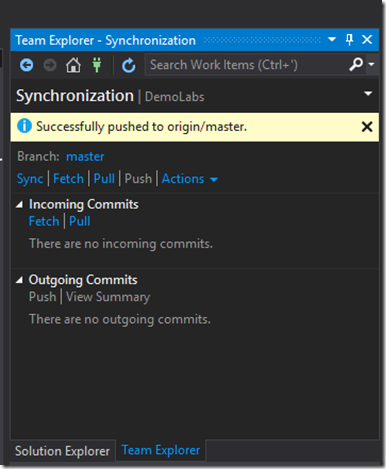
image

Build kicked off

image

Build finished and deployed

SNAGHTML2c00ca50

Now to validate against the working web application.

It worked. I made the change and the change was “automatically” reflected on the site. Now keep in mind this is simple way to perform this function. If you needed to perform a rolling deployment, or some other type, it would make sense t to adjust for Octopus Deploy process to accommodate those requirements.

image

CI/CD Option 2

Option 2 involves some manipulation of Octopus Deploy and not so much TFS/VSTS. If we leave what we were currently performing in TFS/VSTS from my previous post we will need to work and manipulate Octopus Deploy a little more.  So following the same example as above we will clone both the TFS/VSTS build and the Octopus Deploy project/build definitions, to ensure that we have a clean break from what worked  to what could work.

How to perform Option 2

There are a couple of items that we need to accomplish here. Because we have already cloned both the Basic Build definition and the Octopus Project, we will work with those cloned items in this mini exercise. For now we are not going to touch the clone of the build definition because it is generic and just performs the build and then packages and publishes the package( s ) to our Octopus Deploy internal NuGet repository.

First we will need to change how our Releases get created. After selecting your Process, find the Automatic Release Creation in the left hand side of the page. Select Project Triggers, this has moved from previous versions of Octopus Deploy and then select the create a release when a package is pushed.

image

image


Then we need to change the behavior of our Lifecycle (more information is here). The important fact here is that if we wish to stay away from modifying our build definition to automatically deploy we can do it within our Lifecycle. One key note here is that the default lifecycle allows for deployments to created environments. While this is not ideal, there is a way for us to create and manipulate a new Lifecycle to benefit our needs. For our cloned project we will need to “Choose a different lifecycle”.
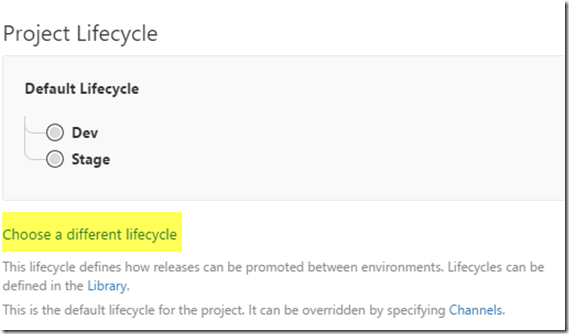
image

Special note here is that the lifecycle once applied, will only be used by your deployment project going forward. Any previous releases that were created will use the previously assigned lifecycle. This can be confusing, but it makes sense because Octopus Deploy takes a snapshot of all of the variables and state of your project for each deployment.

Let’s go ahead and create a new lifecycle:

Click Library->Lifecycles-Add lifecycle

image

Then we need to give the new lifecycle a Name and add a Phase.  This is important because the phase helps us describe what we wish to do in each step of our deployment.

image

Adding a Phase means that you are going to be describing what happens to your deployment. After you click the Add Phase you will get this:

image

Give it a name and then click Add environment

image

Initially you will see and empty drop down box and a couple of radio buttons. Select your dev or other environment that you wish to deploy to first and then select Deploy automatically to this environment as soon as the release enters this phase. Then click Add.

image

Now it should look like this:

image

Click Save and we are almost there.

You can can multiple phases and multiple environments to each phase depending on your need. For this exercise, we are putting out the CI/CD basics that you can build upon for your future development and deployment efforts.

Now that I have created that lifecycle, I need to perform a couple more things to get everything wired up and in sync.

First, I need to go back to my project and change the lifecycle from Default to CI-CD Option2.

image

The next thing we have to do is change the Automatic Release Creation under the Project Triggers.  Warning here is that if you have an external NuGet or other repo that you are dealing with this option will most likely not work for you.  There may be an option 3 workaround, but I haven’t gotten to that state yet.

Click on Project Triggers and then

image

image check the “Create a release when a package is pushed to the built-in…” make sure you select the deployment step that contains your package, then click Save

image

Let’s test this out.

image

Our build was successful.

image

And it just works now.

image

Outcomes

From Option 1 it is clear that you can just use the Create Release step and not be dependent on both the Octopus Create Release and Octopus Create Deployment. Either option is viable and can be used interchangeably depending on your needs. You can have build definitions that work on specific branches of code for CI/CD and then use the promote package to your higher environments. The above technique while focused on a simple web application can be used for more complex deployment scenarios and applications.

Building Multiple Projects and Pushing to Octopus Deploy with Build vNext

In some cases there is need to have multiple projects within a solution that each require being packaged and then published or pushed to your repository of choice for deployment.  Typically from a Web Application perspective you could have Web Services, Web Api, and finally the Web Application itself.

What I am about to detail for you is performing these actions with success using TFS 2017 and Octopus Deploy.  These same actions can be applied to Visual Studio Team Services (VSTS). Be warned that this technique will not apply to older XAML build definitions.

Assumptions

We are going to assume that you have basic solution with .Net MVC Web Application, MVC WebApi, and Windows Services projects. You can more than this, but for the purposes of this demonstration this is what we have. Something like this:

image

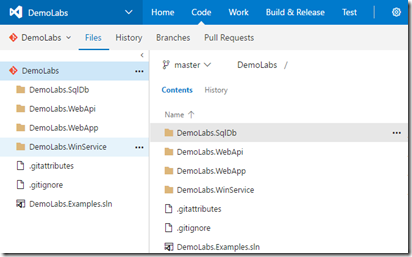
And we have the solution checked into Source Control like this:image

You will also want to make sure that you have Octopus Deploy extension installed or applied to your account or TFS instance.

Where to Start

Well the most common thing here is that you will need to create is a basic Visual Studio vNext Build Definition. Log into your Project and Navigate to Build & Release and then click New in the right hand corner.

imageimage

Now we are going to Scroll down and choose a Visual Studio build template. I won’t go into the details of all the different templates are, but for this exercise we will choose Visual Studio because it is a very quick way for you to get started.

image image

Now that we have our basic build definition in place it should look something like this.

image 

Now save what we have so that we can start with the meat of this exercise. The next little preparation that you have to do make sure that you create a Service Endpoint for your Octopus Deploy input. I will be using Built-in Nuget Repository, but can also use and external NuGet repository of your choice. The fields that you will need to fill out are listed at points 3, 4, 5. You need to give the connection a meaningful name that you can remember. You must provide a url to the octopus instance that you intend to publish to and finally you will need to have an API key with the minimum permissions to publish to the Octopus internal NuGet Repository. Rule of thumb here is to create or have a Octopus Service Account that has the appropriate permissions.
image

How its done

We now have the basics set up. So lets get into the requirements for getting multiple projects to be compiled, packaged, and pushed to Octopus Deploy. Previously you would have to have a lot of pre-work done to your actual project/solution, e.g., adding OctoPack, creating a nuspec file, etc. With the new build system and its extensibility, it makes your projects/solutions much cleaner and much simpler to use especially if you add more projects to your solution that require packaging and publishing later on.

Edit your saved build definition and select Build Solution step. We need to make an adjustment here to ensure that

  1. We get a separate folder for each project
  2. We ensure our Output Directory for the solution is pointing to our ArtifactsStagingDirectory

Like so.

 image

What this will do will ensure that the build output from the step will go to the build artifacts directory on your build agent, similar to this:image

The “a” in this case means Artifact.

We will not worry about the Test Assemblies step right now and we can also leave the Publish Symbols and Copy Files Step and the Publish Artifact alone for now. The point of this post is to get your projects built, packaged, and published for deployment. Next what we need to do is add another few build steps to our Build definition.

Click on Add Build Step

image

And then we are going to Add the Octopus Package Application step, one for each of our projects that we wish to publish. Then we are going to add the Octopus Push Package(s) to Octopus step to finish up our Build.

image

Now for each of the projects you will need to edit the Package Id, Version, but more importantly you need to know what and where your source and destination path is going to be. If you don’t these two items correct, your build will fail.

image

We do know that our output is going to the artifacts directory and we know that each project is going to have its directory. But a critical component here is what the Octopus Step is going to do. It is important to note that we want, must, need to do is

  • Keep your package small
  • Take only the most relevant codebase

I have seen so many teams in the past and currently take everything from their source tree and package it into a 100MB+ file and attempt to push it to Octopus Deploy then deploy all of source tree to production. It is really hard to contemplate the security risks of putting your entire codebase for someone to steal and compromise.

For web applications and web api projects there is typically a _PublishedWebsites folder, this folder contains a reduced build output with only the most relevant dlls, config files, and other content for your web application or web api to run. Everything else is irrelevant and if you choose the folder at the higher level you will essentially get two copies of the same code base in your package. Citing the two points above, keep the package small and only package the most relevant code! This doesn’t mean only the files that have changed! This means your most minimal amount required run your application.

Now that we have edited the Package steps, we can move on the other important final element to this post, which is the Push Packages to Octopus.

Select the Push Packages step and you will notice that you need to edit the Octopus Deploy Server (this is the Service Endpoint that created earlier) and the most important item is the the location of the packages.  Earlier in this post I told you that you didn’t really need to worry about the Publish Artifact step. The drop directory is where we are going to put our package after the build and packaging steps and that same directory is going be where we find those packages and publish them to our Octopus Deploy NuGet feed.

image

Now we are done! Save all the work that we have done and then queue a build. Don’t get frustrated if you your build doesn’t register success. Take a look at the logs for each build you attempt and step through to ensure that your folder paths are correct. Ensure that the API Key has correct permissions to publish to the Octopus NuGet Repository.

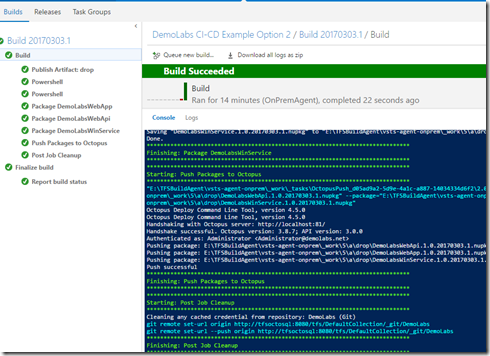
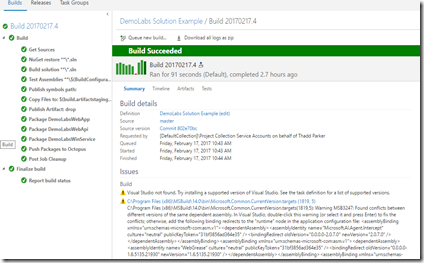
If you do have a successful build it tell you that it performed the compilation, packaging and publishing of the packages. Similar to this.

image

SNAGHTML10847104

image

Checking each step to ensure that the logs are telling me what is happening.

image

image

SNAGHTML108a0b87

and finally verified it has been pushed to our Octopus Deploy instance.

SNAGHTML108ba689

Next Steps

Now that I showed you how get your build to package and publish to Octopus. You may wonder what about CI/CD? or what can I do now?

To answer the second question, you can actually go ahead and make this a task group and save it for other teams to utilize in the future. You can also use this technique for other project types as well. Once you understand how you can create a package with the Octopus Deploy Extension, you can change the build definition to a CI/Timed Build and get those packages published for the next phase.

To answer the first question: That is for another post.