For a bit now, I have been describing to teams how they can deploy their SSIS packages to their SQL instances automatically, but I never “really” had to do it myself. Until now. The client that I am working with currently just went through a very large migration of on-premise TFS to VSTS and with that came the need to change how their reporting structure was both generated and consumed. Before the migration, we were generating ALM reports through direct SQL queries against the on-premise TFS Warehouse. During the migration and onward we had to generate an SSIS package that would pull information directly from the VSTS Rest API and populate a local data warehouse that could help us accomplish nearly the same thing. Since I wanted to keep my solution and project clean – no OctoPack (which isn’t supported, although you can hack your project to include it), and no nuspec file or extraneous other items in my solution like a .nuget folder – I opted to see if I could perform an auto-deploy just using VSTS and Octopus Deploy. Here is how I did it, while keeping my SSIS solution pristine and leveraging the available marketplace tasks and Octopus Deploy step templates.
Setup
For this blog post I am using VSTS and Octopus Deploy version 3.13.10. Caution – your mileage may vary depending on whether you use TFS 2017 or a lower version of Octopus Deploy, but the technique is sound.
Assumptions:
- You are using the internal nuget repo of Octopus Deploy. I can’t claim this process will work with external repos, but that is a challenge to others who read this.
- You have a rudimentary understanding of VSTS and Octopus Deploy and how they each work independently.
Here is what you will need:
- VSTS Account where your SSIS solution is located – this example is using Git, TFVC will work just as well
- SSIS Marketplace Task – installed on your VSTS or TFS instance
- Octopus Deploy Integration Tasks – installed on your VSTS or TFS instance
- Octopus Deploy Project with servers already added to your environments
- Octopus Deploy API key pushing packages from VSTS to Octopus Deploy built in repository (How to generate api key)
- The Octopus Tentacles running on your destination servers should be running as a service account that has dbo access to your DB and local admin rights on the server to execute Remote PowerShell.
VSTS Component
Building out the CI build is straight forward, except that with SSIS, SSRS projects, the standard MSBuild and .NET Desktop build templates do not work as required. As Abel SquidHead points out you can perform an SSIS Build using commandline tasks within a build definition, but wouldn’t it be a more elegant to have a Build Task that did all the work for you save for a couple of parameters?
So to start, we need to add a Octopus Deploy Service Endpoint connection.
Click Ok and you should see something like this:
Now click on the Build and Release tab and create a new Empty Build definition. 
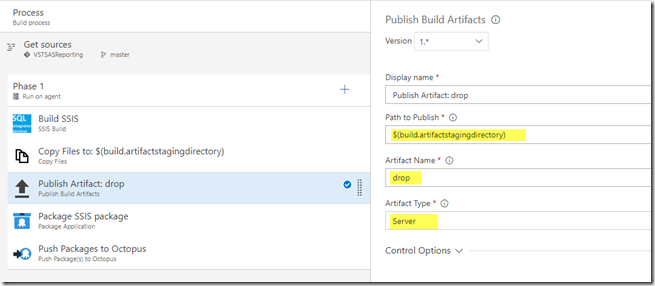
Then add the SSIS Build Task, Copy Files, Publish Artifact,the Octopus Deploy Pack, the Octopus Deploy Push Packages.
Note: You add tasks by clicking on the “+” symbol in the Phase 1 section.
Edit the Build SSIS task to point to your solution and project if necessary.
Next edit the Copy files Task so that it looks like so:
Next Edit publish artifact task so that it looks similar to this. You want to make sure that pushing your artifacts to a drop location for the next step to pick it up without all of the other bits and pieces that comprise your source tree.
Next Edit your Package Step. There is a lot to do here, but I will try to explain it a little by the numbers. I won’t describe the Advanced areas, but will leave that to the reader to experiment with. What this step does is simulate the same effort that a nuspec file performs when added to your project.
- Represents the name of the package you want. This name should be a constant for any package you wish. If you need to put other information, revision numbers, etc you can use the Nuget or Advanced options to provide the proper metadata for your package
- Represent the package format, until recently Octopus Deploy’s internal nuget repository only handled nupkg files, now it allows you generate either nupkg or zip files for you usage in your Octopus Deployment process
- This is the version number that will be appended to the package ID described above. This should be an auto-incrementing number so that each time you build you get a new version. Important: This version number does not typically represent the internal versioning of your package’s content. This is used as a metadata field to ensure that you are going to deploy the latest from your build output.
- Represents the location where your output resides, in this case it will be in the bin directory of the solution.
- Represents where you want to put your zipped or nupkged file contents, in this case the “artifactstagingdirectory\drop” folder
Now we move onto the last task in our process. Edit the Push Packages to Octopus. This pretty straight forward. Just select your Octopus Deploy Connection that you created earlier in this blog and the location of where you put your nupkg or zip file. (In this example I am using the nupkg format).
Now click the Save and Queue drop down and select Save. Give a reason if you wish and then we select the Triggers menu item for our process. Select CI, use the master branch and then click Save again.
You are now done!
It wise for you to test out your build first. One piece of advice is to disable the Package and Push Octopus steps first so that your build actually does what it is supposed to do and then enable each step after each successful build.
Octopus Deploy Component
There are a couple of things here that need to be accomplished for this section of the blog.
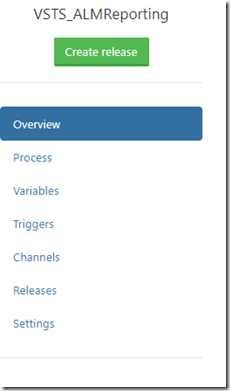
First login into your Octopus Deploy instance and then navigate to your project. You should see something like this:
You first want to select the Process to create how your deployment process is going to work. The following Options will be dependent upon you creating the process flow.
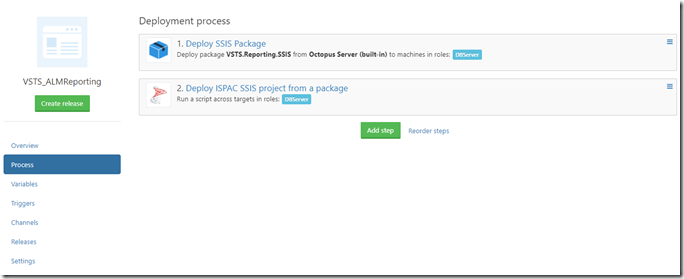
In the beginning your project and process will be blank and it will be helpful in getting your process started. There are a lot of options to choose from, but for this exercise we are going to choose Deploy Package and Deploy ISPAC SSIS project from a package step found under the SQL Server grouping. Once you do that your process should look something like this:
I will not dig too deep into the mechanics, but I will let you know what you need to change in order to make this deployment process clean and smooth.
First, lets edit the Deploy Package step. You will need to scroll down to the bottom of the page. Select the Configure Features link and uncheck everything except for “Custom Installation Directory”. Click Apply and now your Deploy Package step should look similar to this:
Select Package name you chose from setting up VSTS. Simply typing a few letters will give you an autocomplete for the package you are looking for. In the custom installation directory, select a directory that you wish to put the package in and have it unpack itself. For more control you can use Variables to change this location based on server or environment. Click the save button at the bottom of the page and now we go on to the next step.
Edit the Deploy IPSAC SSIS project step. This step is an incorporation of a community step that I have used before in other SSIS implementations. Since we are going with the basics here. You should see something similar after you have filled out the appropriate fields.
Once we have filled in the appropriate values and have selected the step that gives us the location where the ipsac file is going to be located at. Now we will finish this up with either one of the following options.
Note: The fields can be edited depending on what your particular requirements are. Coordinate with your DBAs to better understand how these different fields work within your particular implementation.
Option 1 (Automatic Release Creation):
Option 1 revolves around Automatic Release Creation. Octopus Deploy has an observer mechanism that looks at changes to packages that are being inserted into the Octopus Deploy internal repository.
First select Triggers. This is going to get us to the point where when a new build from VSTS has successfully completed we can observe a new package coming in and then have it automatically deploy to our initial environment.
This section was moved from a previous version of Octopus Deploy, but the mechanism. First check the Create a release check box and then select the package step that will be executed when a new a package is pushed to the internal repository. Click Save and you are almost ready to go.
Warning: Automatic Release Creation will not be available if you do not have a Package Deploy step template in your deployment process. In our particular case this doesn’t matter, but it is worth to note.
Option 2 (Lifecycles):
Lifecycles are yet another way to for you to
- Define Quality gates for your deployments
- Give greater control on how to keep your deployments from reaching Production pre-maturely
By default, when a project is a created the Default Lifecycle is pretty wide open. So what we are going to do is give ourselves a gated way to ensure that we automatically deploy to our lowest environment and then require manual or other types of approval for higher environments.
First select Library and then the Lifecycles left hand menu selection. You should see something like this:
Select the Default Lifecycle so that we can edit it. The purpose here is to put the gateways in place for our different environments. The default before we edit will not have an element selected called Phases. Phases allows for deployers to select different environments to start and end a particular process. Since we know that we have just one project and it will have to start in our dev and then move upwards from there after various checks.
Note: Once you have selected a Lifecycle for your project, each new release and deployment will use that Lifecycle. You cannot change your Lifecycle once you have created a release and deployed that release.
First we are going to add our 1st phase, this will help us establish where are starting point in the deployment process is going to be. We click Add Phase and then we see something like this:
We select our initial environment, select the automatically deploy radio button, click add, then give our Phase a meaningful name and then click Save. We can then go and other phases for this lifecycle, but for the sake of brevity this work is for getting things done.
I won’t go into any in depth discussions here, but there are a lot of options and other items you can use within these different phases to help promote your code from one environment to another.
Now that you have saved everything you are ready to deploy your SSIS code from source control out to servers all the way out to production. You may find that you have do some tweaking with your servers or with the variables that you need to use for your deployment process. By practicing your deployments in a lower throwaway environment, you have a chance of greater success to apply the same process for all of your downstream environments.
Note: If this doesn’t work right out of the gate, don’t get frustrated! The VSTS build logs and the Octopus Deploy Task logs provide a wealth of troubleshooting information your ultimate success.
Finally
This exercise has shown that you can get your SSIS package built, packaged, pushed, and deployed to your lowest environment for immediate testing. The steps shown here are pretty straightforward and can be adjusted to suit your needs. To be honest it took me longer to write and screen capture this post than it took me to build out this pipeline. ![]()
Happy SSIS Deployments!


good stuff!
LikeLike